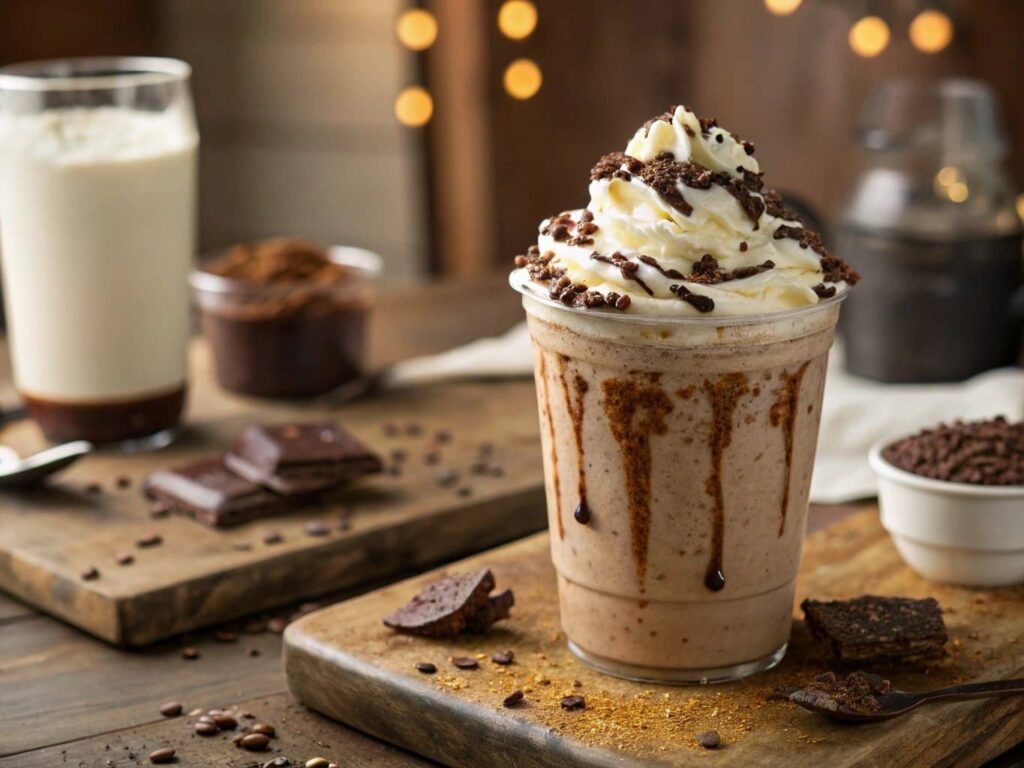
7 Layer Bars are the ultimate crowd-pleaser—a gooey, chewy, and delightfully sweet dessert that’s packed with layers of goodness. If you’ve never tried them, you’re in for a treat! Whether you’re hosting a family gathering, attending a party, or just looking for a sweet snack, these bars are sure to impress. This article will guide you through everything you need to know about 7 Layer Bars, from their history and ingredients to how to make them, troubleshoot common problems, and even store and serve them. Ready to dive in? Let’s start!
Table of Contents
What Are 7 Layer Bars? An Introduction to the Delicious Dessert
At first glance, 7 Layer Bars might seem like just another sweet treat, but there’s something special about them. These bars are made up of seven delicious layers that come together to create a dessert unlike any other. From the crunchy, buttery crust to the gooey, sweet center filled with chocolate chips, coconut, and more, 7 Layer Bars are a little bit of everything. It’s like a layered dream wrapped up in a perfectly baked dessert!
Here’s the fun part: You can customize these bars to your liking. Add in your favorite nuts, fruits, or even swap out some ingredients for alternatives. There are endless possibilities! But before we get too ahead of ourselves, let’s break down the core of what makes these bars so special.
“7 Layer Bars are more than just a dessert; they’re a celebration of sweet layers that come together to form the perfect bite.” 🍪
Origins of 7 Layer Bars: A History of the Iconic Dessert
Like many classic desserts, the exact origin of 7 Layer Bars is a bit mysterious. However, it’s widely believed that these delicious bars came into popularity in the 1960s and 1970s. Some say they were first introduced at church potlucks, where the layered dessert became an instant hit. Others suggest they were a variation of the popular “magic bars” that emerged around the same time. Either way, 7 Layer Bars have remained a beloved dessert in many households to this day.
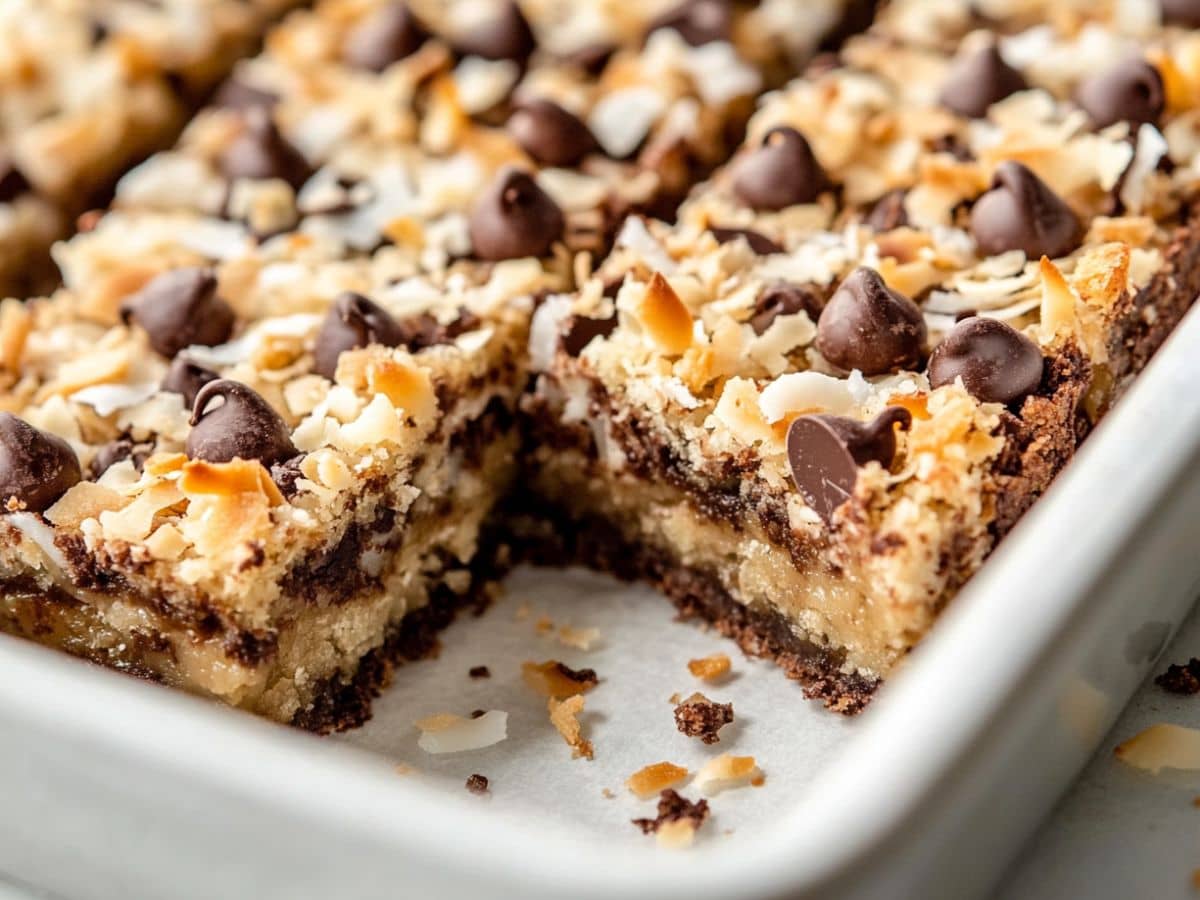
The layers in the bars are not only delicious but also visually appealing. They create a vibrant rainbow of textures and colors, from the golden brown crust to the dark chocolate chips and shredded coconut. They’re as fun to look at as they are to eat!
Key Ingredients You Need for the Perfect 7 Layer Bars
Now that you know what 7 Layer Bars are, it’s time to talk about the ingredients. Making the perfect 7 Layer Bars requires just a few simple ingredients, but when they’re combined, they create something magical. Here’s a rundown of the key components you’ll need:
| Ingredient | Quantity |
|---|---|
| Graham cracker crumbs | 1 ½ cups |
| Unsalted butter, melted | ½ cup (1 stick) |
| Sweetened condensed milk | 1 can (14 oz) |
| Chocolate chips (semi-sweet) | 1 cup |
| Shredded coconut | 1 cup |
| Chopped walnuts (or pecans) | 1 cup |
| Butterscotch chips | ½ cup |
| Sweetened coconut flakes | ½ cup |
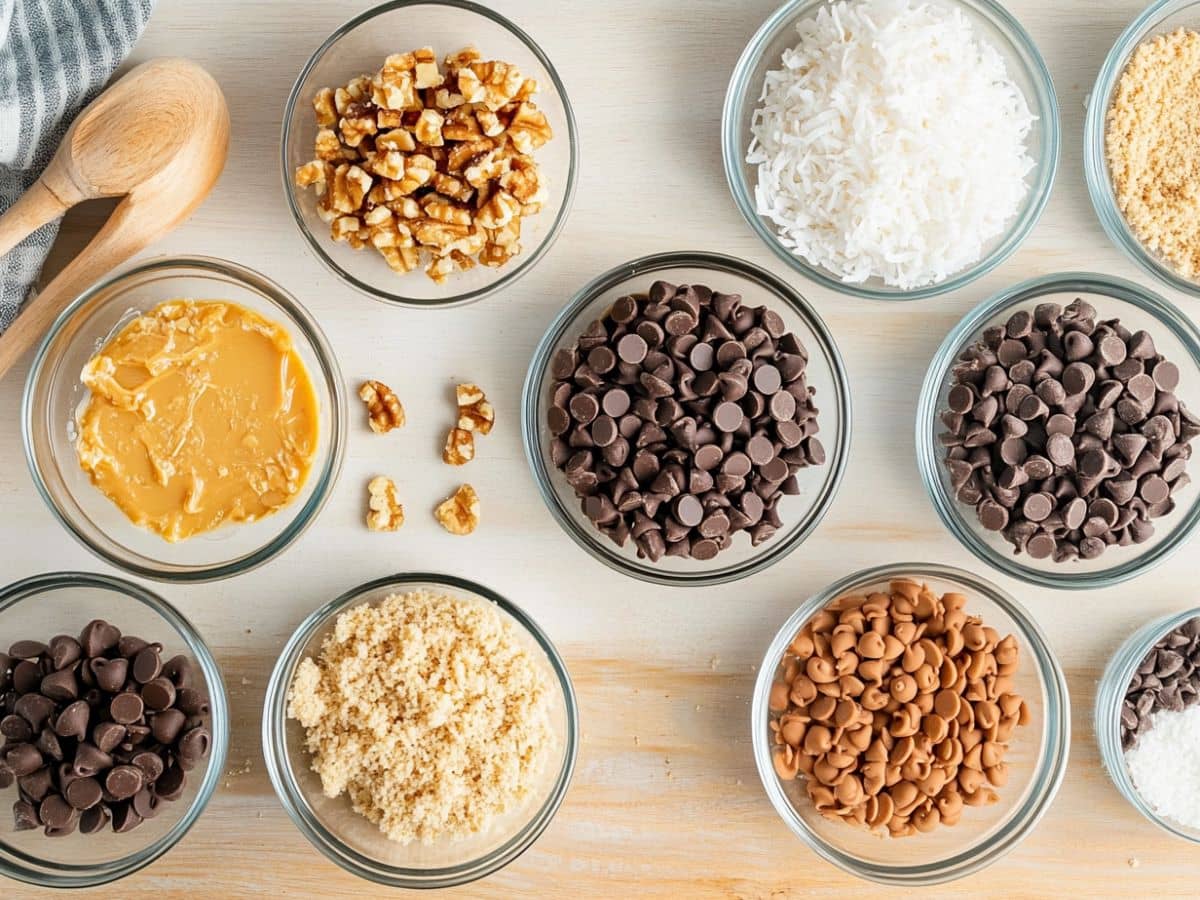
Each of these ingredients contributes to the bars’ signature texture and flavor. From the rich, buttery graham cracker crust to the gooey sweetened condensed milk that binds everything together, every layer is essential to the perfect 7 Layer Bar.
“The right combination of ingredients is the secret to the perfect 7 Layer Bars. Don’t skip any layers!” 🍫
Layer by Layer: Understanding the Components of the Bar
What makes 7 Layer Bars so special isn’t just the ingredients—it’s how they’re layered. Each layer adds something different: crunch, chewiness, sweetness, and richness. Let’s break down each layer:
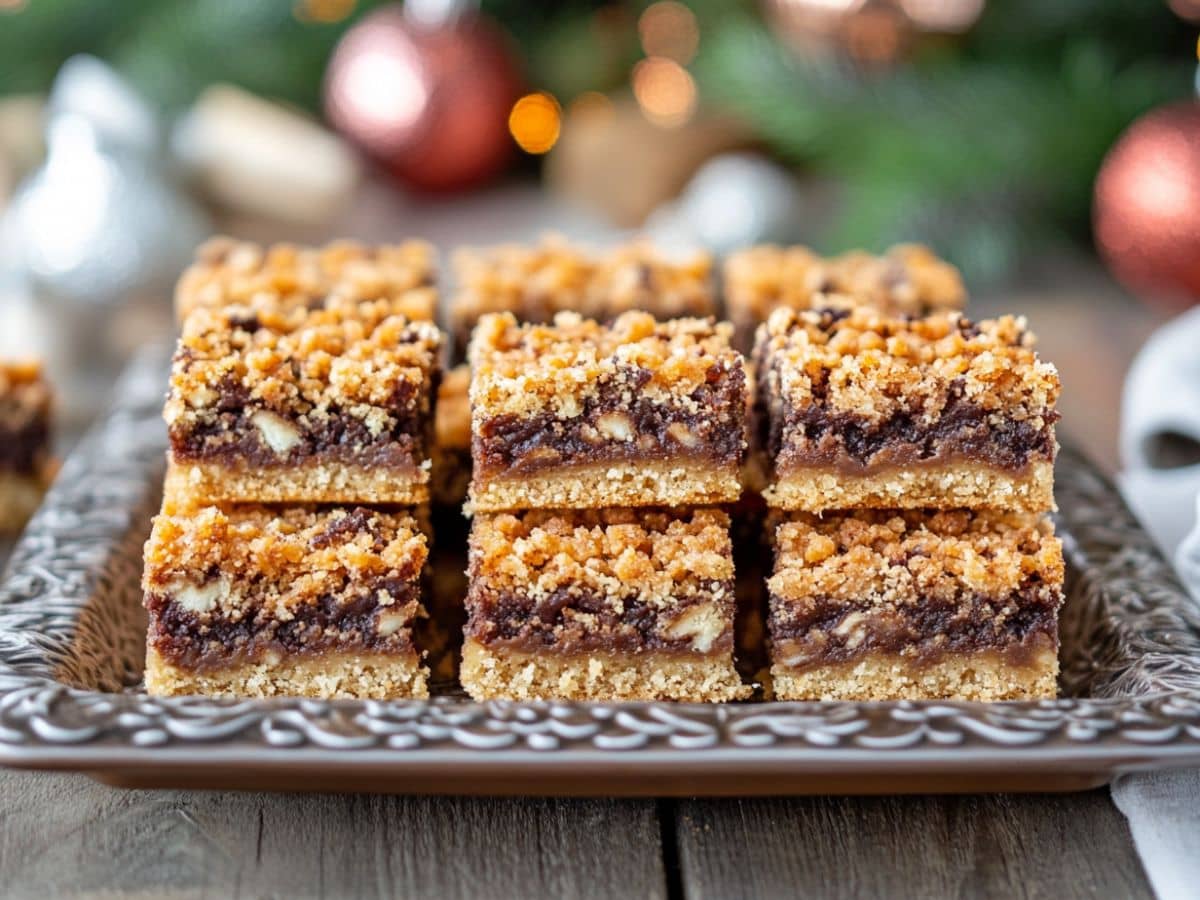
- Layer 1: The Graham Cracker Crust – The base of the bar is made from graham cracker crumbs mixed with melted butter. This forms a solid, crumbly crust that adds a bit of crunch to the otherwise soft dessert.
- Layer 2: Sweetened Condensed Milk – The sweetened condensed milk acts as the glue that holds all the layers together. It also provides a rich, creamy texture that contrasts beautifully with the crunchy crust.
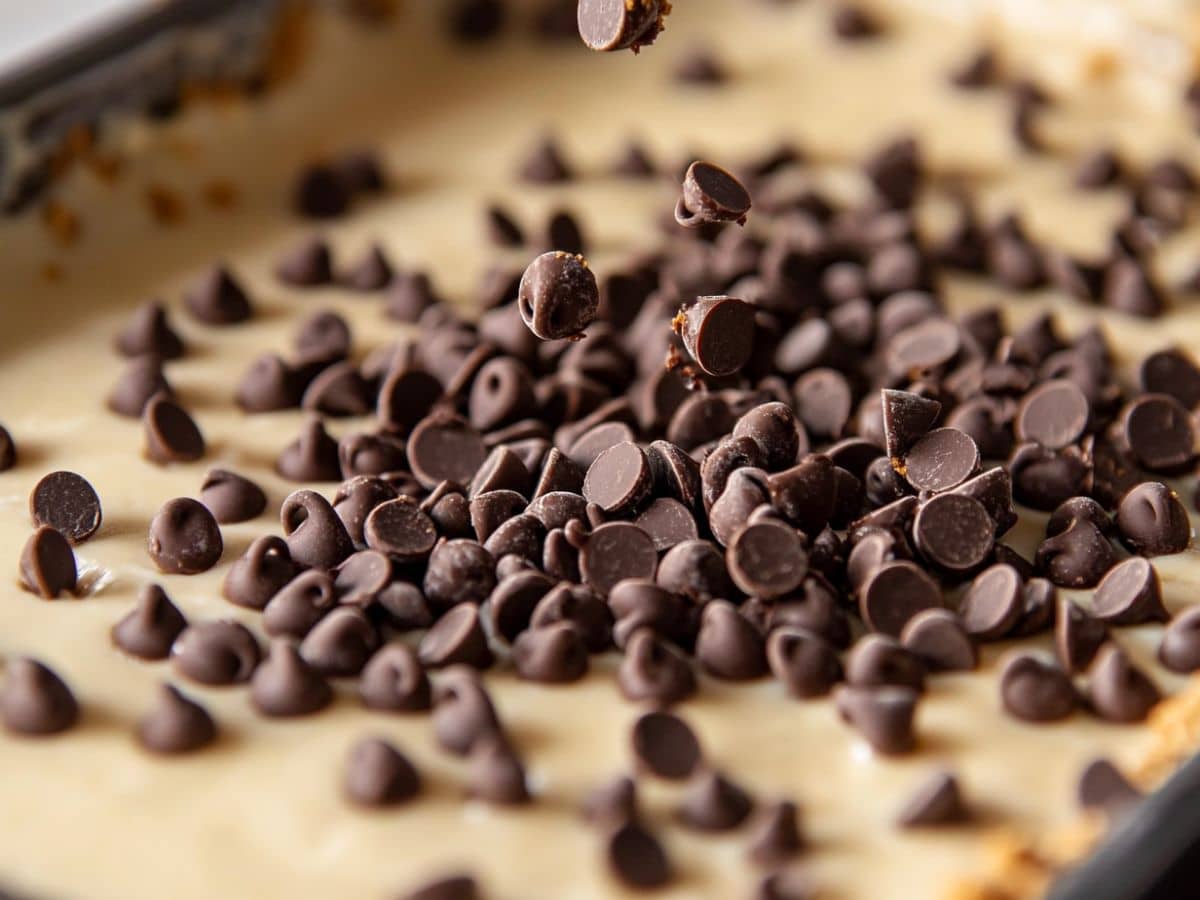
- Layer 3: Semi-Sweet Chocolate Chips – These are the chocolatey goodness that melt into the bars, giving them a rich, smooth texture and deep flavor. They’re also one of the most popular layers!
- Layer 4: Shredded Coconut – Coconut adds texture and a bit of chewiness. Plus, it complements the sweetness of the other layers with its subtle tropical flavor.
- Layer 5: Walnuts (or Pecans) – Nuts add crunch and an earthy flavor that balances the sweetness of the bars. You can swap walnuts for pecans if you prefer a slightly sweeter, milder nut flavor.
- Layer 6: Butterscotch Chips – These little bits of butterscotch melt into the bars, adding an extra layer of sweetness and flavor that’s hard to resist.
- Layer 7: Extra Coconut Flakes – The finishing touch is another layer of coconut. This final sprinkle helps give the bars their signature look and a touch of additional coconut flavor.
How to Make 7 Layer Bars: A Step-by-Step Recipe
Now that we know the ingredients and layers, it’s time to get our hands dirty (in the best way possible!) and bake some 7 Layer Bars. Here’s a simple, step-by-step guide to making these delicious treats.
Step 1: Preheat Your Oven and Prepare Your Pan
Start by preheating your oven to 350°F (175°C). Grease a 9×13-inch baking dish with butter or line it with parchment paper. This will ensure that your bars come out of the pan easily after baking.
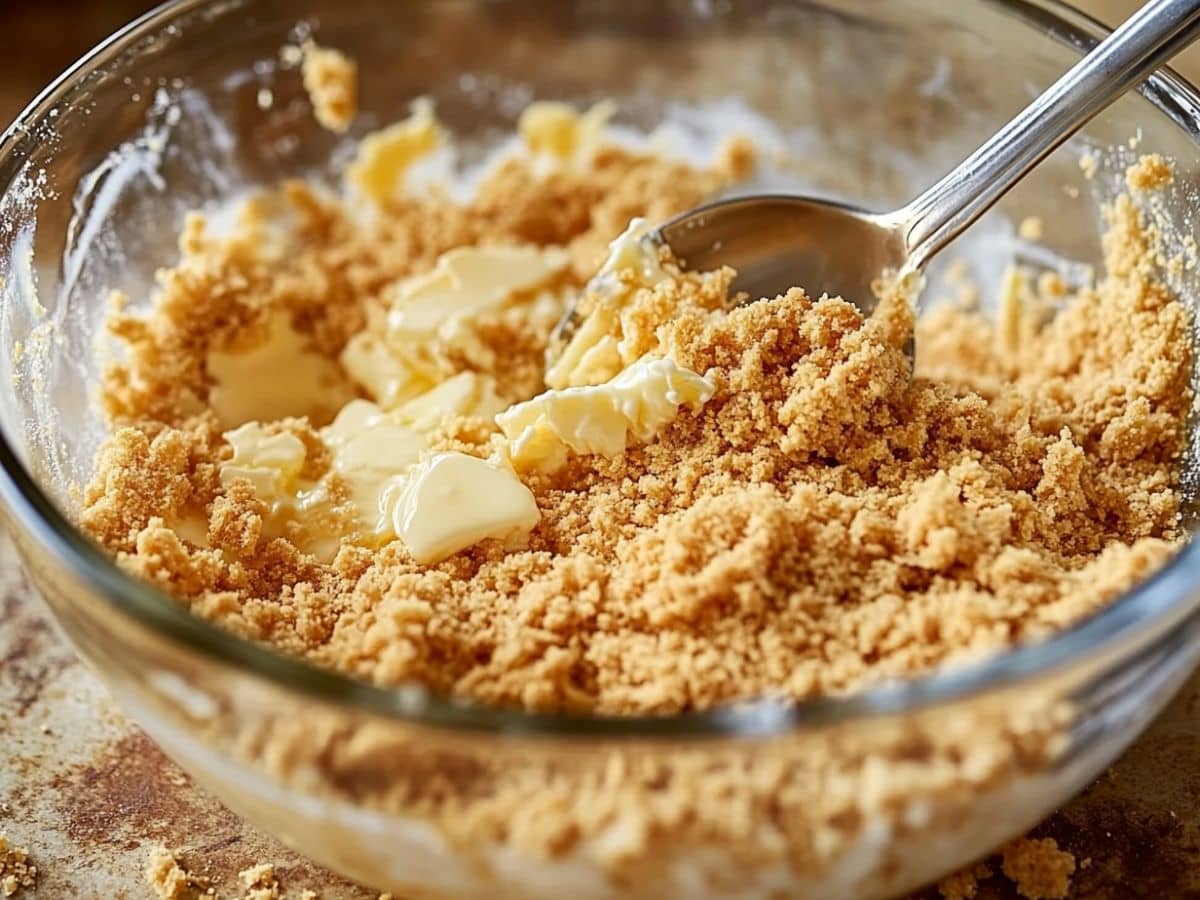
Step 2: Make the Graham Cracker Crust
To make the crust, combine your graham cracker crumbs and melted butter in a bowl. Stir until the mixture is well combined and crumbly. Press the mixture evenly into the bottom of the prepared baking dish. You can use the back of a spoon or your hands to make sure it’s packed down firmly.
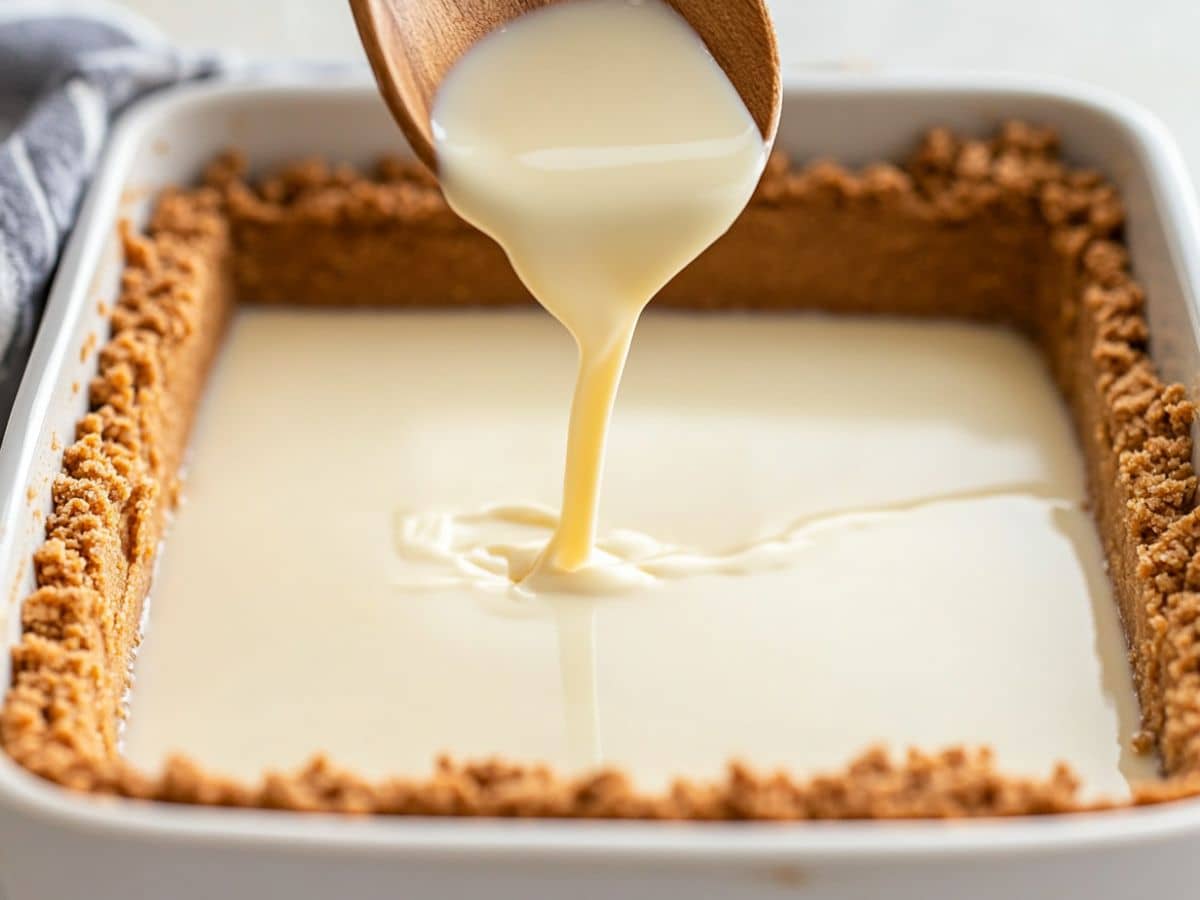
Step 3: Add the Sweetened Condensed Milk
Next, pour the entire can of sweetened condensed milk over the graham cracker crust. Spread it evenly to cover the entire surface. This will serve as the “glue” that holds all of the layers together.
Step 4: Layer the Remaining Ingredients
Now, it’s time to layer the remaining ingredients. Start with the semi-sweet chocolate chips, then add the shredded coconut, walnuts, and butterscotch chips. Finish by sprinkling the extra coconut flakes on top. Don’t worry about making it perfect—the layers will spread and melt into each other as they bake!
Step 5: Bake the Bars
Place the baking dish in the preheated oven and bake for about 25-30 minutes, or until the top is golden brown and bubbly. You’ll know they’re ready when the chocolate is melted and the coconut on top has turned slightly golden.
Step 6: Cool and Cut
Once they’re done baking, remove the bars from the oven and let them cool completely. This step is essential—cutting them while they’re still warm can result in messy bars. Once cooled, slice them into squares and enjoy!
“The best part of making 7 Layer Bars? Watching the layers melt together in the oven!” 🍫
In the next part, we’ll dive into troubleshooting common problems that may arise when making 7 Layer Bars, along with tips for customizing them to suit your taste!
Common Problems When Making 7 Layer Bars and How to Solve Them
Even the most experienced bakers encounter issues sometimes, especially when working with layered desserts like 7 Layer Bars. But don’t worry—if you face any of the problems listed below, we’ve got the solutions to help you fix them and ensure your bars turn out perfect every time. Let’s take a look at the common challenges and how to troubleshoot them.
The Layers Aren’t Sticking: Troubleshooting the Binding
One of the most frustrating problems when making 7 Layer Bars is when the layers don’t stick together properly. This can happen if you don’t use enough sweetened condensed milk, or if the layers aren’t packed tightly enough. The sweetened condensed milk serves as the binder for all the ingredients, so it’s crucial to cover the crust evenly and spread it well. If your bars fall apart, try adding a bit more condensed milk next time, ensuring it’s distributed evenly.
Solution: Make sure to use a full can of sweetened condensed milk and spread it across the entire surface of the crust. If you notice the bars falling apart, press down more firmly when layering to help the ingredients bind together.
“When the layers don’t stick together, it’s a sign that the sweetened condensed milk didn’t do its job. Don’t skip it!” 🍯
The Bars Are Too Crumbly: Fixing the Texture Issue
If your 7 Layer Bars are too crumbly, it might be because the crust isn’t firm enough or the bars were underbaked. To prevent this, make sure you pack the graham cracker crust tightly into the pan so it’s sturdy. Also, ensure that you bake the bars long enough for the layers to meld together. If they still crumble after baking, try letting them cool for a longer time before cutting.
Solution: Press the crust down more firmly before baking and bake the bars for the full recommended time. Allow them to cool completely before cutting to help the layers set.
“A solid crust is the foundation of a sturdy bar. Pack it well, and bake it just right!” 🍪
Overbaking or Undercooking: Getting the Right Bake Time
Overbaking or undercooking your 7 Layer Bars can easily happen if you’re not paying attention to the time. Overbaking leads to dry, hard bars, while underbaking can result in gooey, uncooked layers. To prevent this, watch the bars carefully as they bake and take them out as soon as the top is golden brown and bubbly. Keep in mind that the bars will continue to cook a bit once they’re out of the oven, so don’t leave them in for too long!
Solution: Stick to the 25-30 minutes bake time, but check the bars closely during the final minutes to make sure they don’t overbake. If the top is golden and the edges are firm, they’re done!
“It’s all about balance—bake them just right for that perfect texture!” 🍫
How to Customize 7 Layer Bars: Adding Your Favorite Flavors
One of the best things about 7 Layer Bars is that they’re incredibly customizable! While the traditional recipe is fantastic, you can easily add or swap ingredients to make them your own. Whether you want to add a little extra crunch, swap in different flavors, or make them more festive, the possibilities are endless. Here are some fun ideas for customizing your 7 Layer Bars.
Adding Nuts and Fruits for Extra Flavor
Nuts are a classic addition to 7 Layer Bars, but you can mix things up by experimenting with different varieties. Walnuts and pecans are popular choices, but try adding almonds, hazelnuts, or even macadamia nuts for a unique twist. You can also include dried fruits like cranberries, raisins, or chopped dried apricots for extra sweetness and texture.
Tip: If you want a more tropical vibe, add chopped dried pineapple or mango to the bars for a fun, fruity twist!
“Nuts and fruits are like the cherry on top of these layered bars. Get creative with your mix-ins!” 🥥
Experimenting with Different Chocolates and Toppings
If you’re a chocolate lover, try swapping out the semi-sweet chocolate chips for milk chocolate, dark chocolate, or even white chocolate. You can also experiment with adding other types of chocolate, like peanut butter chips or mint chocolate chips. For an even richer experience, drizzle some melted chocolate on top of the bars once they’ve cooled.
Tip: Add a sprinkle of sea salt on top of the bars to balance out the sweetness and give them an extra flavor boost!
“Chocolate is your playground—experiment with different types and create your own signature flavor!” 🍫
Storing and Serving 7 Layer Bars: How to Keep Them Fresh
Now that you’ve baked the perfect 7 Layer Bars, the next step is to store and serve them properly to keep them fresh and delicious. These bars are incredibly versatile, and they stay fresh for a surprisingly long time when stored correctly. Here are some tips for storing and serving your 7 Layer Bars:
How to Store for Long-Lasting Freshness
To store your 7 Layer Bars, place them in an airtight container at room temperature for up to 5 days. They’ll remain soft and chewy, and the flavors will stay fresh. If you want to store them for longer, you can freeze them! Just wrap the bars tightly in plastic wrap or place them in a freezer-safe container, and they’ll last for up to 3 months. When you’re ready to enjoy them, thaw them at room temperature for a few hours.
“The best way to store 7 Layer Bars? Keep them in an airtight container to maintain their fresh, gooey goodness!” 🥥
Serving Tips for Special Occasions
7 Layer Bars are perfect for sharing at parties, potlucks, or family gatherings. You can serve them in bite-sized pieces for easy snacking, or cut them into larger squares for a more indulgent treat. For a fun twist, try drizzling caramel or chocolate sauce over the bars before serving, or add a scoop of ice cream for a decadent dessert experience.
“Serve your 7 Layer Bars with a scoop of ice cream, and watch them become the star of the party!” 🍦
Why 7 Layer Bars Are the Perfect Dessert for Any Gathering
Whether you’re planning a family get-together, a holiday feast, or a casual gathering with friends, 7 Layer Bars are the ideal dessert to bring along. Not only are they incredibly easy to make, but they also look impressive and taste amazing! Here’s why they’re perfect for any occasion:
Making 7 Layer Bars for Parties, Holidays, and Potlucks
One of the best things about 7 Layer Bars is that they’re versatile enough to be served at a variety of events. Whether you’re hosting a birthday party, a holiday dinner, or attending a potluck, 7 Layer Bars are sure to be a crowd-pleaser. They’re easy to transport, and you can even cut them into bite-sized pieces for a fun, shareable treat. If you’re making them for a special occasion, consider adding festive toppings or garnishes that match the theme of the event. For instance, you could drizzle some red and green icing over the bars for a holiday twist, or top them with sprinkles for a birthday celebration.
Tip: If you’re looking for a fun touch, try serving your 7 Layer Bars on a colorful platter with some fresh fruit or whipped cream on the side. The more creative you get, the more your guests will love them!
“7 Layer Bars are more than just dessert; they’re an experience. They bring joy to any occasion!” 🍰
7 Layer Bars: A Delicious Twist on Traditional Desserts
If you’re looking to try something different but still want a dessert that feels familiar, 7 Layer Bars are an excellent choice. They have all the comforting elements of traditional baked goods like brownies and cookie bars, but with a unique twist. The combination of textures and flavors—crunchy crust, creamy sweetened condensed milk, and gooey layers of chocolate, coconut, and butterscotch—makes them stand out from the crowd.
What’s more, you can always experiment with different flavor combinations to make the bars your own. Whether you prefer dark chocolate, milk chocolate, or even white chocolate, you can tailor the bars to suit your preferences. Add in some extra fruit, a sprinkle of cinnamon, or a drizzle of caramel to bring even more flavor to the table!
“7 Layer Bars are a modern take on a classic dessert, with endless options to mix things up!” 🍫
7 Layer Bars: Frequently Asked Questions (FAQs)
Got questions about 7 Layer Bars? We’ve got you covered! Here are some of the most frequently asked questions about these delicious bars.
Can I Make 7 Layer Bars Ahead of Time?
Yes! In fact, 7 Layer Bars can be made a day or two in advance. Simply store them in an airtight container, and they’ll stay fresh. Making them ahead of time is a great option for busy days or when you’re preparing for an event.
What Substitutes Can I Use for the Ingredients?
If you have dietary restrictions or simply want to try something different, there are plenty of ingredient swaps you can make. For example, you can use gluten-free graham crackers for a gluten-free crust, or substitute the sweetened condensed milk with a dairy-free alternative. You can also swap the nuts or chocolate chips for your favorite varieties or omit them if you prefer a simpler bar.
“Feel free to swap ingredients—7 Layer Bars are as customizable as you want them to be!” 🍪
Now you’re ready to bake the most delicious 7 Layer Bars ever! Whether you follow the traditional recipe or get creative with your own twists, these bars are sure to be a hit wherever you go. Happy baking!
Wrapping Up: Making 7 Layer Bars Your Own
In conclusion, 7 Layer Bars are a delightful dessert that anyone can make and enjoy. With a few simple ingredients and some creative layering, you can whip up a batch of these bars in no time. And because they’re so versatile, you can customize them with your favorite mix-ins or experiment with different flavor combinations. Whether you’re baking them for a special event or just because, 7 Layer Bars are guaranteed to satisfy your sweet tooth!
Remember, the key to the perfect 7 Layer Bars lies in the layers. From the buttery graham cracker crust to the sweetened condensed milk that binds everything together, each layer plays an essential role in creating the perfect dessert. And if you ever encounter any problems while baking, don’t worry! With a few simple adjustments, you’ll be able to fix common issues and make these bars even better. Now, it’s your turn—grab your ingredients, fire up the oven, and get ready to enjoy the most delicious, indulgent 7 Layer Bars ever!
“The beauty of 7 Layer Bars is that they’re a little different every time you make them. Enjoy the process, and make them your own!” 🍪
7 Layer Bars
Equipment
- 9×13 Baking Pan
- Oven
Ingredients
- 1 ½ cups Graham cracker crumbs
- ½ cup Unsalted butter, melted
- 1 can Sweetened condensed milk 14 oz can
- 1 cup Chocolate chips (semi-sweet)
- 1 cup Shredded coconut
- 1 cup Chopped walnuts (or pecans)
- ½ cup Butterscotch chips
- ½ cup Sweetened coconut flakes
Instructions
- Preheat your oven to 350°F (175°C) and lightly grease a 9×13-inch baking pan.
- In a bowl, combine the graham cracker crumbs and melted butter. Press the mixture into the bottom of the baking pan to form a crust.
- Layer the ingredients in the following order: pour the sweetened condensed milk over the crust, then sprinkle the chocolate chips, shredded coconut, chopped walnuts (or pecans), butterscotch chips, and sweetened coconut flakes on top.
- Bake the bars in the preheated oven for 25-30 minutes or until golden brown and bubbly.
- Remove from the oven and let cool completely before cutting into squares. Enjoy!
Notes
Related Articles You Might Enjoy
If you loved making 7 Layer Bars, you might enjoy trying other delicious and easy-to-make desserts. Here are a few more recipes from our blog to inspire your next baking adventure:
- Wafer Cookies: A Simple and Sweet Treat – Looking for another fun treat? Try these crispy wafer cookies that are perfect for snacking or sharing with friends.
- Peanut Butter Brownie Recipe: A Decadent Dessert – If you love rich, fudgy brownies with a twist, this peanut butter brownie recipe is a must-try! The combination of chocolate and peanut butter will leave you craving more.
Recommanded: